A look back at our gone, but not forgotten, 1993 Lada Niva Project, originally published on 14 January 2013
The 1993 Lada Niva – дополнительный ремонт (Additional Repairs)
A few days after the first 4×4 excursion we decided to make a list of things that needed attention, it went something like this
- Do something about the fuel smell
- Adjust engine camshaft timing set
- Figure out why the heater doesn’t provide heat
- Work with the carburetor for better driveability
- Look for vacuum leaks
- Improve braking
- Fix center differential mounts
Things first got underway with the fuel smell, lots of owners complain about broken vent systems allowing vapor into the cab, so this isn’t an isolated issue. So the initial step was to locate the fuel tank, a quick peak under the chassis revealed nothing there, and the manual cutaway drawing suggested it was in the passenger compartment, somewhere under the rear seats. Shawn was incredulous, but once we removed the interior pieces, there it was, bunkered under the rear bench, and it really smelled. The carpet in the rear passenger footwell was soaked with fuel, the tar sound proofing had been reduced to a black pudding, like a gooey Napalm substance. This clearly explained why Steph’s boots had reeked of fuel after the last outing, she had been splashing her feet about in a puddle of gasoline for much of the day.
We located the source of the leak, the rubber filler neck hose had cracked in three separate places, and was leaking fuel into the footwell every time we fueled up, or made a left hand turn. This was easily fixed with a section 2” diameter hose and I set to work with nitrile gloves, scooping out handfuls of tar slime. The ratty Cossack carpet was thrown in the garbage and the factory rubber floor liner was cleaned for reuse. Even parked with the windows open, the fuel smell remained for over a week.
Item 2 was a bit of an odd one, especially in the way it made itself known, the camshaft timing system in the Lada 1.6L engine is rather interesting in that it requires periodic adjustment by the user, about once every 10,000 kilometers or so. Since our Lada had been driven to near destruction by the previous owner it was obvious that the timing should be adjusted. This is easy to do, simply back off the tensioner nut, located on the passenger side of the engine, turn the engine over two complete revolutions by hand, using either the hand crank from the toolkit or a 38mm socket, and tighten the tensioner back up.
We had done this during our first round of repairs, along with changing the oil and sparkplugs, while the engine ran alright; but it clattered like an old diesel, even after the adjustment. Shawn had been out driving one day when he discovered the Lada had puked some oil and sprayed the engine compartment with 10W40 rather well, back at the shop, we looked it over and found one of the upper bolts in the timing cover was missing. This exact bolt had caught our attention before, it rattled around loosely and wouldn’t tighten up, we figured the threads were stripped out or the bolt was undersized and had frankly forgotten about it.

Groovy!
Now that the bolt was missing the engine was leaking oil from the open hole and we set to fixing it. Even with a bolt of matching thread and size we could get the bolt to tighten, so out came the inspection mirror and flashlight, what did this bolt do and why did it dance when the engine was running? We found the missing timing cover bolt in the skid plates and immediately began to wonder why it had three nicely machined grooves partway through the threads. Shawn, suddenly muttered uh-oh and had an idea, we decided to pull the valve cover and get a topside look.

Now it was clear we had some serious problems.
After pulling out the diagrams of the timing set we quickly noticed that the timing chain damper was missing,  and the double roller timing chain was free to contact the side of the cylinder head, where it had been merrily chainsawing through the cylinder head casting. The steel M6 bolt was been the only thing slowing progress, otherwise we would have had a completely ruined cylinder head.

Grooves not factory installed
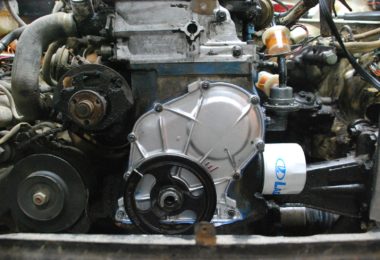
Without the damper in place the chain tensioner adjustment had been meaningless, the slack in the chain was beyond what could be adjusted out. So the next question was where did our damper go? A small scrap of it remained attached to a lower bolt, and it became clear that it was time to pull the front timing cover and go fishing with a magnet.

A successful magnetic fishing trip, new damper shown on right
10 minutes later I was holding a handful of scrap steel, dripping oil from the engine oil pan, and since we couldn’t easily fashion a new one, it became time to make some phone calls
My first call went out to Ital Motors (10827 101 St, Edmonton, AB T5H 2S6 Phone:(780) 424-0553) in Edmonton, they dealt heavily in foreign cars and were the Lada dealership back when they were still available for sale in Canada. Imagine my surprise when not only did they have the part we needed in stock, but it was cheap, less than $20. We dropped our tools and hopped in the Lightning trying to get our foot in the door before their 5pm Saturday closing time.

Timing chain system
We would spend much more than $20 before we left Ital Motors that day.
When we arrived at Ital Motors asking about Lada parts, they were very happy to hear of someone fixing up an old Niva, and what started as a simple damper plate got pretty out of control. After each item we asked about appeared a few moments later, we had amassed enough items to fill a medium sized box; The timing chain damper, a timing chain tensioner shoe, a new timing chain, front crankshaft seal, a timing cover gasket, all in stock and ready for sale. Then Shawn got to thinking about the poor braking performance and asked about a brake master cylinder and vacuum booster, they came out of the stock room still in the packing paper, all of it brand new.
After some Lada related chatting, we paid our bill and made our way back to the shop, we had some serious work to do.

Tensioner shoe, original left, new right.
Once we had disassembled the timing set it was pretty clear that the extra items we grabbed from Ital weren’t extra at all, they were absolutely necessary. When we removed the tensioner shoe, it had worn through the rubber pad and begun to chew through the metal backing, just like it had topside. There was enough slop in the timing set that the camshaft could advance itself nearly 30 degree independent of the crankshaft, who knows where the ignition timing was at any given time. Both Shawn and I were very surprised that there wasn’t piston to valve contact and subsequent damage, much less that we had been driving it around like this.

Tensioner shoe, original left, new right.
We cleaned up and painted as many parts of the engine as we could while doing the job, the front cover, valve cover, radiator, pulleys, and air cleaner all got a refresh with some rattle can stuff. We got the timing set done with little effort, a very simple system overall, and when we fired it back up the engine noise was heavily reduced, not entirely gone, but much better.

To be continued…
Great post the same thing just happened to my Niva so this have been a very helpful read.
Cheers,
D.