How to get that new car engine bay, in a few simple steps.
This is the familiar clean, and then bake process commonly used for painless engine detailing, I cannot say I invented this method but it does really work. In fact I might call this the “Mullen Method” after the person that introduced me to this trick, and I have been using it to do astounding before and after cleanings for many vehicles.
You need a few items such as your favorite engine de-greaser, Armor-all, a brush, running water, and something to waterproof any electrical components.
 For this process we will be using a daily driven 1989 2.3L Ford Mustang, it sees a fair number of miles, and all weather conditions. Like any older engine it also weeps fluid from various places, and this makes it an excellent example for the before and after portion.

The first step pertains to waterproofing.
Your engine should be designed with weather-tight connectors and fittings which are made to withstand damp and intermittent wet conditions such as rain and spray.
However, sometimes these connections can fail to provide moisture protection if they are aged or over exposed to direct high pressure streams of water, etc. For this reason it is recommended that you wrap or otherwise protect suspect components. Modular Ford 2 Valve engines are especially bad for sometimes collecting water in the coils/spark plug holes during washing, leading to all sorts of drivability issues. It isn’t rocket science just be moderate with the application of water.

Following the directions on the engine degreaser, warm your engine, apply the product and allow to stand as directed. Be sure to heed any label warnings about contact with paint, plastic, aluminum, and your summer beverages.

If the engine is quite dirty, use a brush to clean bad spots.

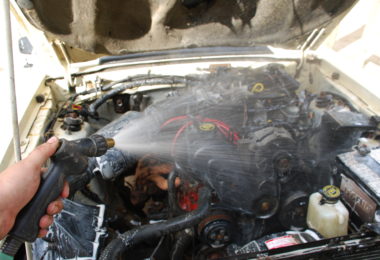
Using a gentle spray from the hose, rinse away any degreaser.

Here we have our freshly cleaned engine, now it’s time to preserve that “wet” look.

This is the easy part, simply spray armor-all over the entire engine compartment, avoid large puddles and mop up any that occur.


Now close the hood and start the engine and idle for 5-10 minutes

Open the hood and you should be rewarded with an easy to maintain, show-room shine.


This method took more time to photo and write-up than it did to actually do, and if it looks this good on a daily driver, imagine your own results.