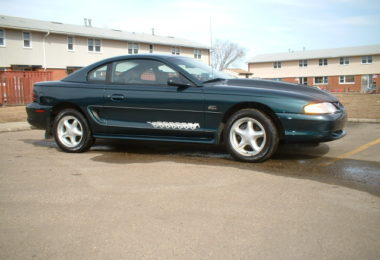
The 1995 Mustang GTS, the Longest Running GTC Project Car – PART 3
This is Part 3 in a multi part series on the 1995 Mustang GTS project, if you missed PART 1, it can be found here LINK
As a performance car owner, September ’03 in Edmonton was interesting and educational, it had a massive car scene, and casual street racing was common, almost tolerated. There were a number of car clubs that made it their business to prowl the streets at night and “cruise” and it was only a few months before the Green GTS as a regular participant in the cannonball grade trips around the surface streets.
Click here to see “back in the day” footage! (Spot the GTS at 1:01 and 1:30)
There was a lot of money in Edmonton, being a prosperous from oil related jobs was typical, and lots of guys dumped their fat overtime cheques under hood.
If you flipped open a copy of Muscle Mustangs and Fast Fords magazine in those days, anything you seen on those pages could be found in the engine bay of a local Fox or SN95 car. Basically every 5.0L pushrod car had upgrades to the Heads, Camshaft, and Intake, typically Edelbrock stuff, the Modular equipped cars generally had a Vortech Supercharger, or a sniff of Nitrous, either combo made around 350 horsepower, the hot cars stacked H/C/I and power adders and developed more than 400 horsepower. (These are almost laughable numbers by modern standards, lol – Darren)

Appearance, not performance

Hankook K102, hard as hockey pucks, and similar traction.
I started modifying the GTS in a rather inefficient manner, messing about with some styling changes because I found the exterior of the SN95 body to look soft next to a New-Edge Mustang. A Cervini’s Ram-Air hood, treated in flat-black, was installed, it was heavier than stock and had terrible fitment. A set of used Eagle Alloy 077 17” Saleen style wheels replaced the 16” Waffles, too-bad they were the wrong offset and actually degraded handling. The worn 225/55-R16 Pacemark Radial GT tires were replaced with a slightly less worn set of 245/45-R17 Hankook K102’s, hardly an upgrade in rolling stock.
Despite reading piles of Mustang modification books and magazines I was rather reluctant to dip my toe into the pool of performance modification, I didn’t have a shop, only a basic toolset, and it was my daily driver to work. If something went off the rails with hot-rodding, I’d be in a bad spot, but after struggling to keep the other cruise cars in sight during the more spirited runs, I cautiously started tinkering.

There is no greater motivator than being at wide open throttle and having the car next to you drown out your engine and tear off like you were parked…
Finally, time to open the hood
Between the fenders of this GTS was a low-mile, untouched gem of a 5.0L, everything just as it rolled off the line in Dearborn a decade prior….
Like many of you, the first engine upgrade came as a K&N drop-in Airfilter, and pulling intake silencer, I didn’t notice a change in performance but the whoosh of the intake sounded a little meaner. After being inundated with countless hours of Powerblock TV on Spike, I decided I wanted that Flowmaster sound and paid to have OEM mufflers removed and a set of Super 40 mufflers installed. This too did little to improve power, droned heavily, and after paying a shop to weld them in, cost nearly as much as a cat-back system that may have actually bumped power. A chip was added, a literal Superchips.Inc “blue chip” I have no idea what the adjustments were in this thing, all I knew is that the engine would ping at WOT with anything less than the very best branded 91 octane. Better use of that money would have been a timing light and a “10 minute tuneup” (dating myself here) but hindsight is a constant 20/20.
“The 10 minute tune up.”
The first order of business is to remove the air silencer located in the inner fender just ahead of the Mustang’s air filter. Designed to reduce induction noise, it costs a few horsepower and can just be yanked off. While in there, most 5.0 enthusiasts replace the stock paper air filter with a less restrictive aftermarket part such as the one from K&N Engineering. These two changes alone are usually good for 7 to 10 horsepower.
The next step is to reset the base initial timing from its factory setting of 10 degrees before top dead center (BTDC) to between 13 and 16 degrees. This doesn’t necessarily pick up horsepower, but it dramatically improves bottom end torque. (In fact many cars were delivered with their timing retarded to about 5 or 6 degrees, which truly hampered performance.)
The last trick is used only when racing, and that is the installation of a shorter-than-stock accessory drive belt (70 2/3 inches (179.4cm) in length), you can bypass certain power-robbing accessories and thus free up some horsepower. These tricks will usually result in a noticeable seat-of-the-pants improvement while improving your quarter-mile time by three- or four- tenths. – Stangnet User

Original crankshaft pulley left, vs the March Underdrive right
The one good upgrade was the installation of a MARCH Underdrive pulley kit, it reduced the speed of the water pump and alternator in exchange for reduced charging and cooling. This didn’t make any more power, but did allow a few horsepower to head for the back wheels rather than the accessory drive.
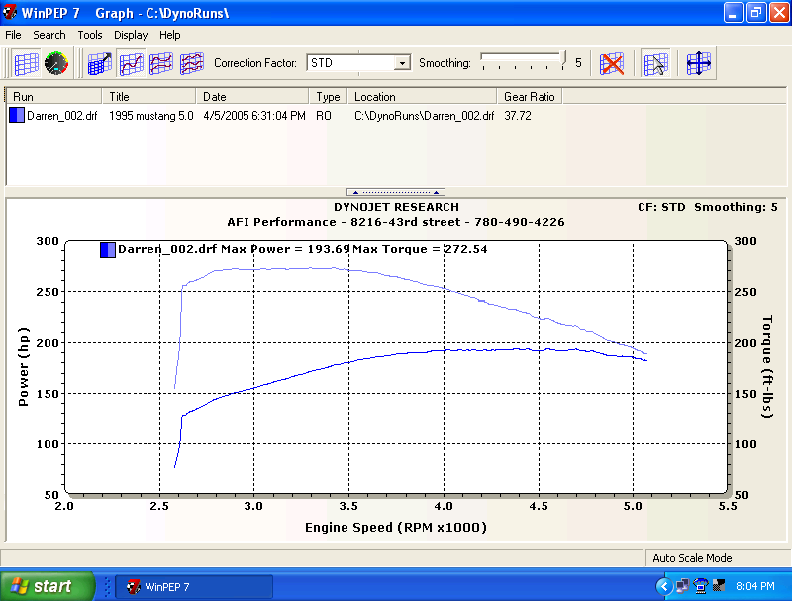
In the spring of 2005, a local dyno shop had opened and the opportunity to baseline presented itself. I had done the rough math, starting with 215 HP, the chip, filter and mufflers should have added some power right? I had hoped for 240 HP (flywheel) so knock 15% off for driveline, 204 RWHP, this would prove to be more than pie in the sky wishes.
Once the car hit the rollers of the Dynojet, it got the compliment of being the weakest 5.0L Mustang he’d ever tested.

193 RWHP and 272 TQ – Standard Correction, Mediocre!
Even working this back to the flywheel was disappointing; at best a 227 flywheel HP my first $1000 spent in modifications only netted me 12 horsepower over the rated stock numbers.
Slightly embarrassed and tail between my legs I spent the drive home convincing myself that the car at least “felt fast”. After the self-pity wore off, I resolved to try to do actual modifications that added actual power, and not to trust magazines for quick and easy fixes.
In PART 4 we actually modify the car and reap rewards.
